



Quick fixes when the Wi-Fi icon disappears: (1) restart the computer and the router; (2) turn the icon back on: Settings > Personalization > Taskbar > Other system tray icons (or Turn system icons on or off) > enable Network; (3) restart the WLAN service: services.msc > WLAN AutoConfig > Automatic > Start; (4) in Device Manager > Network adapters, enable the Wi-Fi adapter if it shows a down arrow (disabled), then update or reinstall the driver; (5) run the network troubleshooter (Settings > System > Troubleshoot); (6) restart Windows Explorer in Task Manager; (7) reset networking: Settings > Network > Advanced > Network reset (reinstalls adapters; you must re-enter Wi-Fi passwords). On laptops with a Wi-Fi switch or Fn key, turn wireless back on.
A missing Wi-Fi icon is a common computer problem: without it you cannot pick a wireless network or get online. The cause can be anything from a simple setting to a driver or hardware fault. This guide walks through the fixes for Windows 10, 7 and 8.
Update 11/2026: Windows 10 reached end of support on 14 October 2025. Personal PCs enrolled in Extended Security Updates (ESU) receive security patches until 12 October 2027; business PCs (domain-joined, Entra ID or MDM-managed) need paid annual ESU. Checking the network adapter driver and the WLAN AutoConfig service works the same way on Windows 11.
Businesses reviewing which PCs can move to Windows 11 or need the right licences can see genuine Windows licensing for business or our IT Support service.
Why the Wi-Fi icon disappears
- The icon has been hidden by accident.
- The Wi-Fi driver is missing or corrupted.
- A required Windows service (WLAN AutoConfig, Event Log, Network Connections) is not running.
- The network adapter is disabled or faulty.
- A Group Policy setting removes the network icon.
How to fix a missing Wi-Fi icon
Method 1: Restart the computer
If the icon vanishes after the computer has been running for a while, a software conflict may be the cause. Restart the computer and check whether the icon returns.
Method 2: Check whether the Wi-Fi icon is hidden
Step 1: Press Windows + I to open Settings.
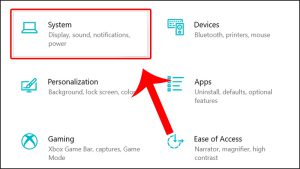
Step 2: Choose System.
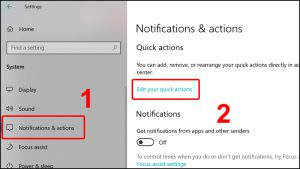
Step 3: In Notifications & actions, click Edit your quick actions.
Step 4: Click Add and choose Wi-Fi.
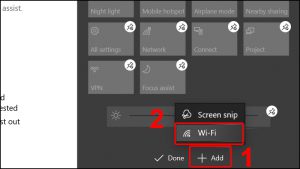
The Wi-Fi button now appears again:
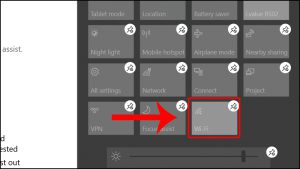
Method 3: Show available networks from Settings
Step 1: Press Windows + I to open Settings.
Step 2: Choose Network & Internet.
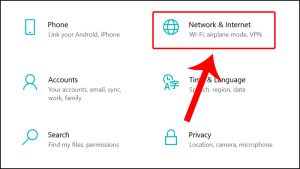
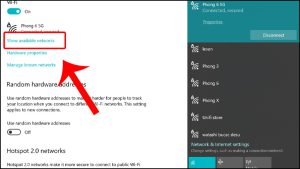
Step 3: On the Wi-Fi tab, click Show available networks.
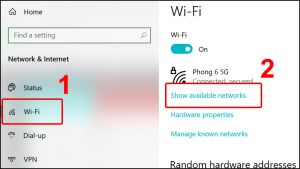
The list of Wi-Fi networks is displayed:
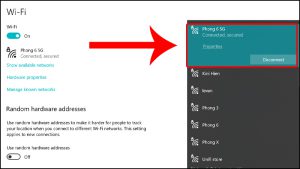
If networks do not appear, run the network troubleshooter from the same page.
Method 4: Start the Windows Event Log service
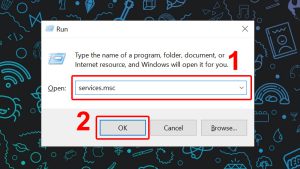
Step 1: Press Windows + R to open Run.
Step 2: Type services.msc and click OK.
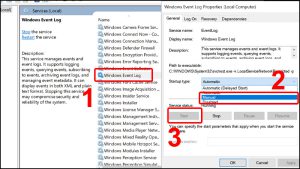
Step 3: Double-click Windows Event Log, set Startup type to Automatic and click Start. While you are here, check that WLAN AutoConfig is also set to Automatic and running.
Method 5: Reinstall the Wi-Fi driver
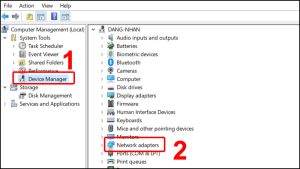
Step 1: Right-click This PC and choose Manage.

Step 2: Open Device Manager and expand Network adapters.
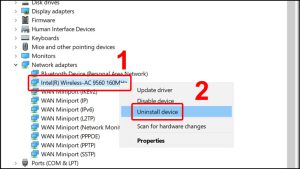
Step 3: Right-click your Wireless adapter and choose Uninstall device.
Step 4: Right-click Network adapters and choose Scan for hardware changes so Windows detects the adapter and reinstalls the driver.
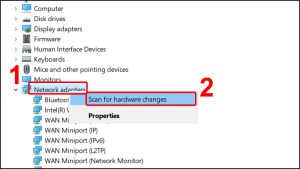
If the problem started after installing or removing an old Cisco VPN client, its leftover network filter can hide Wi-Fi. In that case continue with the next steps:
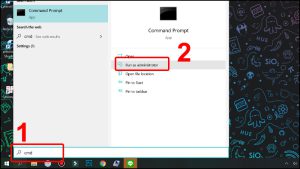
Step 5: Search for cmd and open Command Prompt with Run as administrator.
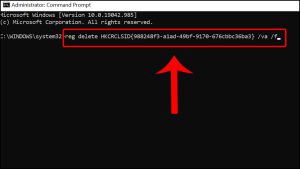
Step 6: Run reg delete HKCR\CLSID\{988248f3-a1ad-49bf-9170-676cbbc36ba3} /va /f and press Enter.
Step 7: Run netcfg -v -u dni_dne and press Enter.
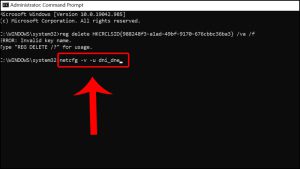
Then check Wi-Fi again with Show available networks as above.
Method 6: Reset the network adapter
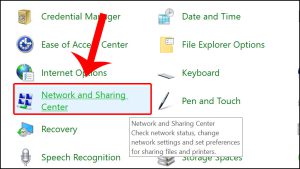
Step 1: Open Control Panel.

Step 2: Click Network and Sharing Center.
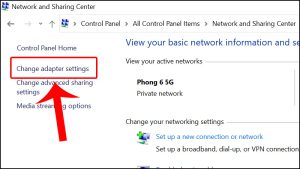
Step 3: Click Change adapter settings.
Step 4: Right-click Wireless Network Connection (or Wi-Fi) and choose Disable.
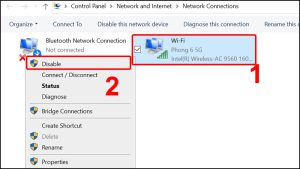
Step 5: Right-click it again and choose Enable (or double-click it) to turn the adapter back on.

Method 7: Turn the network icon on in Taskbar settings
Step 1: Open Control Panel.

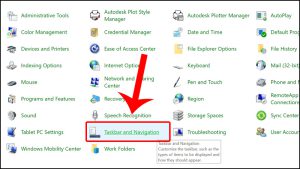
Step 2: Choose Taskbar and Navigation.
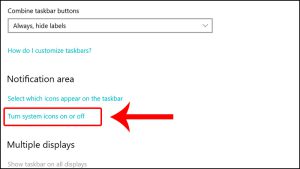
Step 3: Click Turn system icons on or off.
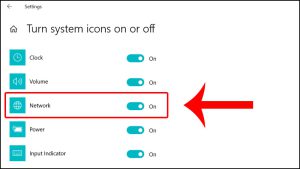
Step 4: Switch Network to On.
Method 8: Restart network services
Step 1: Press Windows + R to open Run.
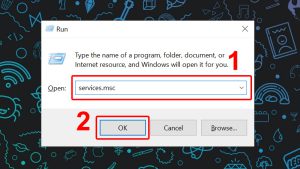
Step 2: Type services.msc and click OK.
Step 3: Right-click each of the following services and choose Start (or Restart) so they are all running:
- Remote Procedure Call (RPC)
- Network Connections
- Plug and Play
- Remote Access Connection Manager
- Telephony
- WLAN AutoConfig
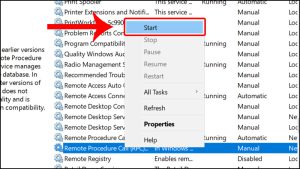
Then check whether the Wi-Fi icon is back.
Method 9: Enable the network icon in Group Policy
Step 1: Press Windows + R to open Run.
Step 2: Type gpedit.msc and click OK (Pro, Enterprise and Education editions).
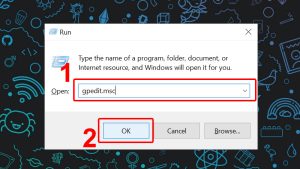
Step 3: Go to User Configuration > Administrative Templates > Start Menu and Taskbar.
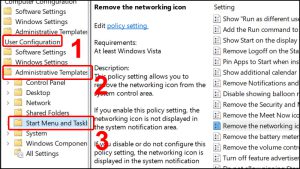
Step 4: Double-click Remove the networking icon.
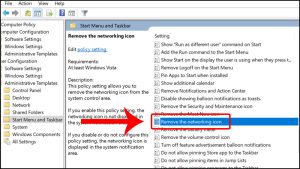
Step 5: Choose Disabled (or Not Configured) and click Apply.
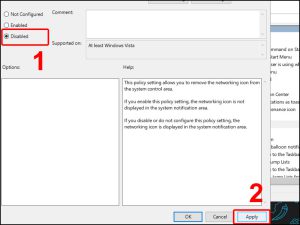
On company computers this policy may be set by IT through the domain, in which case ask your administrator.
Still no Wi-Fi icon?
If none of these methods work, the Wi-Fi adapter may be faulty, or a Windows reset may be needed. For business computers, contact IT Systems at hotline 028.3995.03.59 or contact@itsystems.com.vn.
Unstable office network that needs redesigning?
IT Systems surveys, designs and deploys LAN, Wi-Fi, firewall and VPN for offices and branches, with full documentation.


